The Wirecutter has teamed up with the ocean site The Scuttlefish and underwater photography experts like Sterling Zumbrunn to write this introduction to underwater photographytechniques and gear.
Have you ever wanted to take your camera snorkeling? Wanted to capture images when you’re scuba diving? Are you frustrated by the limitations of your waterproof point-and-shoot and left wondering how pros take those dramatic images in dive magazines? Underwater imaging is an exciting—though complex—pastime, yet it has never been more accessible than it is today thanks to digital cameras. This article seeks to demystify some of the most important concepts behind underwater photography and videography and provide our recommendations on the best cameras (and housings) available today for beginners looking to learn how to shoot underwater.
I’m a professional photographer who specializes in underwater imagery. I’ve taught underwater photography workshops and put these cameras in the hands of the most novice users; some had never taken an underwater photo in their life. I’ve also written a column for Scuba Diving magazine featuring underwater photo techniques.
I’ve been taking photos underwater for 16 years now. I started out on film with amphibious cameras like the Nikonos V, moved onto housed-film systems like the Nikon F100, worked with some of first digital cameras housed for underwater use in the early 2000s. I used to work in sales of underwater imaging equipment. I know what works and how these systems hold up to sustained use in salt water, one of the harshest, most corrosive environments you can bring your camera. Throughout my career, it has become clear that digital cameras have democratized underwater imaging even more than they have for topside (surface) photography. What was previously unavailable to all but the wealthiest shooters is more accessible than ever, more able to deliver incredible, publishable results.
The very first thing to keep in mind is that the foundation of underwater photography is good in-water skills. If you don’t have buoyancy mastered, getting well composed and lit images is going to be a challenge. Worse, you pose a threat to the environment as you crash into the reef while trying to take your shots. Further, underwater photography is exciting and a lot of fun, so it’s all too easy to lose track of time—which can be deadly because of limited air supply and bottom time related to decompression sickness.
For safety’s sake, diving needs to be second nature. The best way to start learning how to dive in the first place is to find a local dive shop and take some classes (which cost about $300 plus gear you might need to rent/buy) or to go on a vacation someplace warm (Hawaii, Florida, Indonesia, Australia, etc.) and find a shop there, but realize you’ll need a couple of days to study and to do actual dives, so plan ahead.
Get close, then get closer! Whatever size your subject is, the most important principle to remember when taking images or video underwater is that you need to shoot through a minimum of water. Water is nearly 800 times as dense as air, and it sucks out color from full spectrum light, so in order for your images to have clarity, contrast, and bright colors, you’ll need to be right on top of your subjects. If you think you’re close enough, you probably should be even a little bit closer. You’ll have to do this by being relaxed and learning how not to spook creatures by letting them get used to you, breathing calmly and approaching with your camera already up.
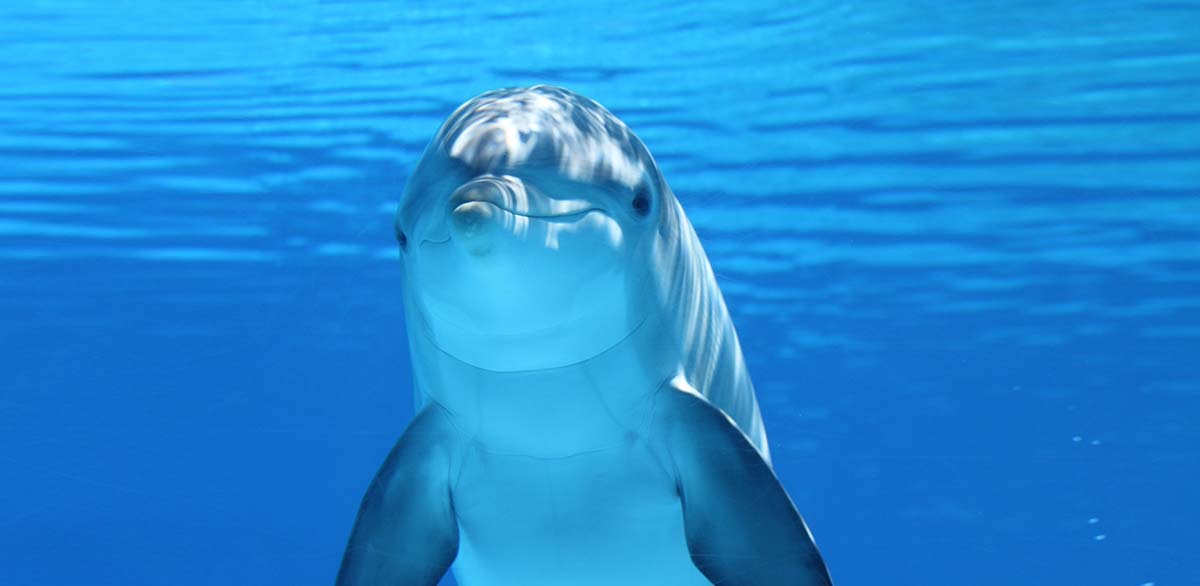
For awe-inspiring underwater photography and videography, you absolutely have to go wide, especially if you want to capture large animals or landscapes. Shooting wide allows you to get very close to a subject for maximum clarity and light while still fitting your subject (say, a dolphin’s entire body) into the frame. The other aspect of getting close is that there’s a minimization of the amount of particulate between you and your subject (suspended in even apparently clear water) that can bounce your flash back, causing a sort of visual fog called backscatter.
Ordinary focal lengths just don’t work well because you’re shooting through too much water and capturing dim, murky images. This need for wide-angle shooting has a direct impact on your camera and housing choices and affects the recommendations we’re making in this article. Macro is the other key lens type to think about. Cameras that can focus close and deliver good magnification are going to be better at capturing the innumerable creatures of the underwater world. Normal and telephoto lenses have virtually no role underwater—leave them at home and save some space in your bag.
Shoot upwards towards the surface, not down (in nearly all cases), so your perspective includes more than just the sea bottom. If you aim your camera down, you are likely going to end up with a jumbled mess as your subject blends into the background of coral to the point where it’s hard to even pick apart the two. Separation is the name of the game; upward angles are key for isolating your subject against the water column. Exceptions: creatures with beautiful backs like sharks, cetaceans, and turtles against contrasting backgrounds like sandy bottoms or open ocean. Trying to shoot is why many photographers opt to use expensive 45 degree or 90 degree viewfinders.
As with any type of photography, proper exposure is critical to get good results when shooting underwater. However, underwater photography adds additional complexity because artificial lighting is used most of the time. This requires balancing light from strobes or video light with the ambient light in the scene, especially in wide angle. This is done by dialing in shutter speed, ISO, strobes, and aperture independently, so it’s good to get comfortable with your camera’s manual mode.
Assuming an ISO is fixed at the right level, in a nutshell an underwater photographer lights a foreground subject by adjusting the aperture and your lighting system’s power. Then, since strobes are faster than the shutter speed and won’t be affected by the adjustment of that, the shutter adjustments are used to correctly expose the background to be light or dark blue (depending on the photographer’s preference). The best underwater images put the viewer in the underwater environment without making it obvious that the image was artificially lit.
This background/foreground and shutter speed/aperture/ISO technique takes a little while to get your head around, but with a little practice, it will lead to well-exposed images.
Prepare to shoot a lot. Shooting underwater is a lot more challenging than shooting on land when first starting out, but by taking a large volume of images and experimenting with your lighting and settings, you can make progress very quickly. It’s one of the great advantages to digital photography that you can easily shoot hundreds (if not thousands) of images and review each one. And for learning how to shoot underwater, you’re going to need that ability.
© 2026 riofotoawards.website. All rights reserved